About two years ago I incorporated LED light therapy into my daily skincare routine at the advice of my aesthetician. I was experiencing breakouts that were leaving purple marks behind and I needed to get rid of them. I asked her what could I do at home to help clear up my skin and prevent new breakouts from developing. She recommended several steps I could take, like using potent serums, DIY lunchtime peels, derma-rolling, and adopting Photon LED light therapy into my skincare routine. Out of these options I have to say the LED is my favorite. It’s safe and easy to use, requires no downtime, and I see results soon after.
In short, LED stands for Light-Emitting Diode, which is a non-invasive anti-aging skincare treatment that works by transmitting packets of light deep into the skin’s layers. These lights help to stimulate collagen and elastin production and work to destroy acne-causing bacteria. NASA has been using it to help speed up the healing of wounds and to help cancer patients. It’s also become a favorite among celebrities and top-notch aestheticians who often incorporate it into their facials and apply it after chemical peels.
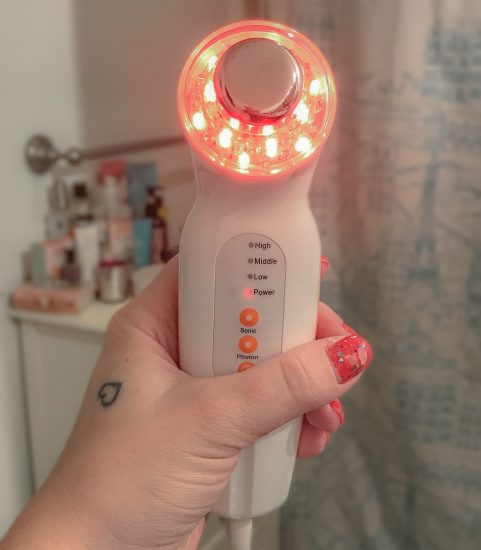
There are many approaches to using LED light therapy; from wands, to masks, to getting it done at a spa. I have had it done professionally, but I didn’t notice any difference (besides the price), from when I do it at home. I ended up choosing the LED 3 Colors Photo-rejuvenation Light by Project E Beauty because of the reviews and reasonable price; It sells for $55 dollars on Amazon.

After I wash my face and I apply Hydrochloric Acid I use the LED light device with a serum which helps it glide on my skin and penetrate deeper. The kit also comes with plastic rings in case you want to add serum to a cotton pad and attach it to the device. Each session lasts for ten minutes and is set on a timer, which turns off once it’s done. To begin, I’ll put the goggles over my eyes that come in the kit.
Blue: The first light is blue and it’s used to help with inflammation and kill bacteria, aka acne. It’s suitable for all skin types, and can adjust sebum secretion, working to get rid of and clear up breakouts. If I’m having a breakout, I’ll concentrate on that specific area. I customize how I use the wand depending on my skin concern. Sometimes I’ll devote the 10 minutes on the breakout, other times I’ll glide the blue light all over my face to prevent acne from forming.
Green: Once I’m done with the blue light, I’ll hit ‘Photon’ and the light will switch to green. This color is used to help clear up hyperpigmentation, aka the dreaded uneven skin tone that can be caused by acne, sun damage or age. Moving the device in an upward motion I’ll glide it around my face. I’ll stop at any areas that are red and spend a little extra time on them.
Red: The last light is red. It helps to increase blood circulation, stimulate collagen, and eliminate wrinkles. This is beneficial for the overall appearance, texture and skin tone. It’s my favorite of the three colors. I notice right afterwards that my pores appear smaller, my skin is brighter, and it has a healthier glow.
Ultrasonic: The ultrasonic function uses high-speed, low-frequency sound waves to lift and firm your skin. It can be used by itself or in combination with the colored lights. The ultrasound waves provide a non-surgical lift by stimulating the skin tissue, and helping to increase collagen, reduce wrinkles, and erase fine lines. It can be set on low, medium, or high-frequency. I use high because I want the light to penetrate deeply into my skin. The vibration isn’t noticeable. The only way to see it is to place a drop of water on the silver tip and it will move around and then dissipate.

I usually do LED light therapy for 10 minutes each morning. Once I’m finished, I’ll apply more serum. I’ll layer This Works Morning Expert Hyaluronic Serum followed by Ole Henriksen’s Truth Serum. If my skin is acting up, I’ll add Mario Badescu’s Drying Lotion to my regimen. (Nara detailed it in her list of must have beauty products and I saw so many comments on how incredible it was, so I had to try it.) To prevent fine lines and wrinkles I’ll apply Kiehl’s Powerful-Strength Line-Reducing Concentrate. The last step is to apply SPF sunscreen. My go-to is Dermalogica Dynamic Skin Recovery, SPF 50.

To be honest, I was skeptical when I discovered this beauty trend and I didn’t have a lot of expectations. I assumed if someone wants to enhance their skin tone, they would have to do something invasive. I went from rarely ever having a breakout in my teens, to getting them often when I reached my late 20s. There are so many products I tried and nothing worked. Then this device came into my life. After using it on and off for two years, not only do I hardly breakout, but the texture and appearance of my skin has changed dramatically. It’s also comforting to know if I get a blemish, this wand will take care of it and when I wake up the next morning, my skin will be clear again.

- Unplug and clean your device with rubbing alcohol before and after each use.
- Always protect your eyes by using the goggles that come with the kit. You can customize how you use the device depending on what your needs are. Choose between rotating the three lights for an overall facial, or stick to one color if you‘re looking for a specific result.
- If you have chronic acne, using LED light therapy can lesson the severity. When using the wand, never move it upward over a zit. This will cause it to get more inflamed. Instead, move in a downward motion.
- This device can be used as often as you’d like. It’s safe, and there’s no recovery or downtime. The more you use it the quicker you will see results.
*This article contains some affiliate links.